Nut, chia seed and raisin bars

Nut, chia seed and raisin bars

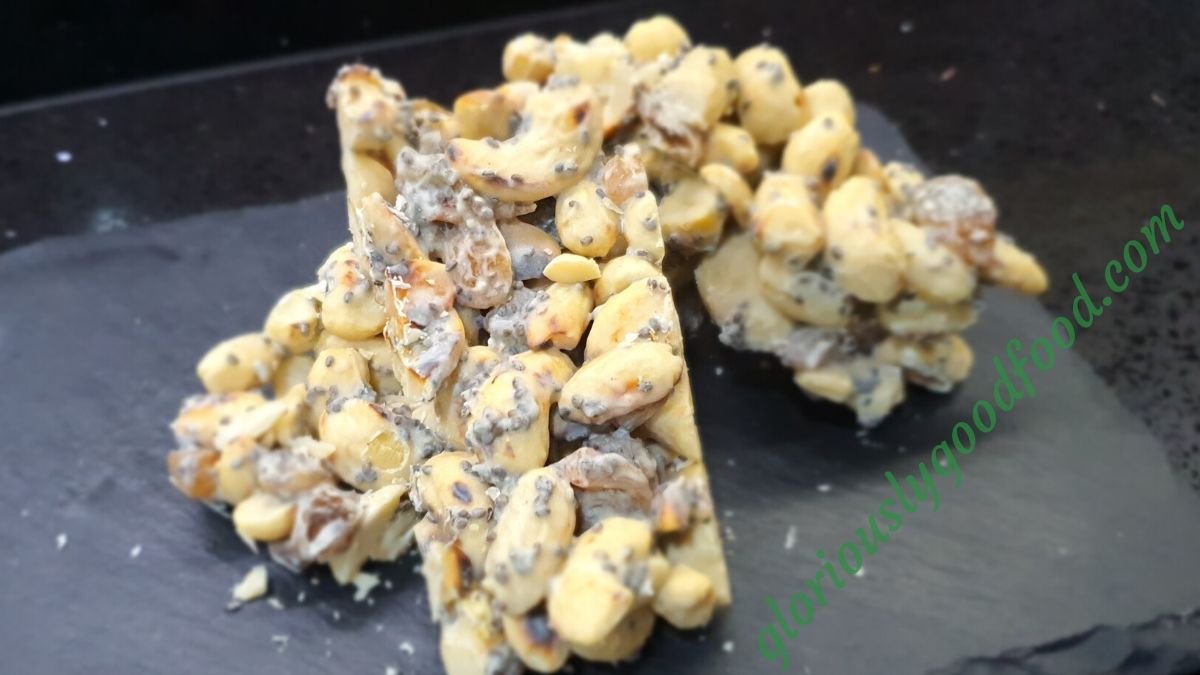
With the Covid-19 crisis affecting our shopping habits and availability of ingredients, I found that the various nut bars I often relied on for breakfast or a quick mid-afternoon snack were not always available in the shops.

I therefore decided to have a go at making my own. I have made these a few times now and they’re a big hit with the whole family, including hubby who doesn’t usually like eating nut bars.

Please note you can use whichever nuts you like – I love cashew nuts and started making them with just those, but they are very expensive (I had a look at the price of bulk bags of pistachios and they were even worse, so I’ll stear clear of those…shame, as I love pistachios!), so now I mix cashews and peanuts and the bars are equally delicious.

Nut, chia seed and raisin bars (makes approx. 14-16 bars)

  • 600g unsalted, unroasted nuts (I use blanched peanuts and raw cashew nuts, which I buy in bulk 1kg bags, but you can use whichever nuts take your fancy!)
  • 50g raisins
  • 70g chia seeds
  • 150g white chocolate (I use Callebaut white chocolate callets as they melt really well in the microwave, but any good quality chocolate that withstands melting and chilling well will work. I buy these in bulk… my latest purchase was a 2.5kg bag, which is dangerous in a house full of chocoholics!)
  • A generous sprinkling of fine sea salt

How to make nut, chia seed and raisin bars

Line a deep baking tray / cake pan with greaseproof paper (mine is 32cm long, 21cm wide and 5cm high, but use whatever you have available as long as it allows for a suitable depth for nut bars). I find it helps to grease the pan with butter or margarine to allow the paper to stick to it and stay flat and in place.

Heat up a large non-stick frying pan on a high heat, then add the cashew nuts and peanuts (or other nuts of your choice). As they start warming up, stir them frequently and as an oily sheen starts to appear, sprinkle them liberally with fine sea salt. Continue to stir frequently as they start to roast. I like the uneven roasting of doing this in a pan, where some are blackened in some parts and lightly golden in others, but it is a matter of personal preference / taste. For a more even roasting, you may wish to do this part in the oven.

While the nuts are roasting, melt the chocolate in the microwave (with the Callebaut chocolate I use, it takes about 2 minutes on high, stirring halfway through – different chocolate may behave differently though and to be on the safe side, you may want to do this more gently in a bain marie, with a bowl over a pan of hot water, letting the steam do the job).

Transfer nuts, raisins and chia seeds into a large mixing bowl and add the melted chocolate, stirring to make sure all the ingredients are well mixed, then transfer into your lined baking tray while still warm. Spread the mix out as evenly as possible and refrigerate for at least a couple of hours or overnight.

Once the giant nut bar is well chilled and solid, take it out of the tray, remove the greaseproof paper and place it on a large chopping board. Using a large knife or cleaver, cut it into 14-16 nut bars. Some small pieces will simply break off, but that’s ok – don’t waste them. Stick them in a bowl and eat them as a snack 🙂

  • Nut, chia seed and raisin bars

Nut, chia seed and raisin bars – Gloriously Simple, Gloriously Good!

Advertisement

Nettle Fritters

Nettle Fritters

During my many Covid-19 daily walks this spring, I’ve been seeing plenty of nettles. This prompted me to make some nettle risotto and while I was using nettles, I decided to also make some nettle fritters.

These nettle fritters are really quick and easy to make and absolutely delicious. Light, incredibly crisp and definitely “una tira l’altra”, as we say in Italian (translates as “each one pulls the next”, i.e. you want to keep eating more of them!). They are a perfect snack or starter 🙂

Important when making nettle fritters:

Nettles will give you a nasty rash (urticaria) if you touch them, so when picking them and handling them prior to cooking, wear long sleeves, long trousers, socks & shoes that cover your feet completely. Also wear gloves! Once they are cooked, they are absolutely safe to touch and eat.

Nettle fritters ingredients:

I don’t have any precise quantities for you here but it really is very easy to make this recipe by just throwing the ingredients together. As for how many nettle leaves you need – it depends how many fritters you want to make!

  • Nettle leaves (as many as you want). I picked the top 2-3 leaf layers off each nettle plant by cutting the stem with scissors below the 2nd or 3rd layer of leaves, taking care to get plants whose leaves were in good condition and not too huge…also I went into the nettles to avoid getting the ones right on the edge of the path.
  • Olive oil or vegetable oil for frying
  • Equal quantities of plain white flour and cornflour
  • Cold water (the colder, the better)
  • Fine sea salt
Nettle Fritters
Nettle Fritters – serve as a delicious snack or starter

How to make the nettle fritters

Wash the nettles (carefully – wear gloves!) and remove the leaves from the stalks, keeping only the leaves.

Heat the oil in a saucepan or fryer – you need enough in there to be able to deep fry the nettle leaves, but as long as you only fry a few at a time, you don’t need a huge pan or vast amounts of oil. You want to get the oil hot enough that when you drop a little bit of batter or a small piece of bread in, it starts frying but doesn’t go dark too quickly as the leaves will need time to cook.

Meanwhile, make a fairly runny batter by roughly mixing the flour, cornflour, water and seasoning generously with sea salt.

Still wearing gloves, take one nettle leaf at a time, dip it in the batter to fully coat it and drop it into the hot oil. Repeat with a few more leaves, taking care not to put too many into the frying oil at once as you don’t want them sticking together. Fry the leaves for 2-3 minutes until they are golden in colour and crispy. As you take them out, place them on a couple of folded pieces of kitchen roll to absorb the excess oil.

Serve while they are still warm and crispy.

Nettle Fritters – Gloriously Simple, Gloriously Good!