Crostata di sbriciolata | Crumble pie

Crumble pie with thick custard filling, shown as a whole pie with one slice cut out of it and slightly pulled away from the rest of the pie.

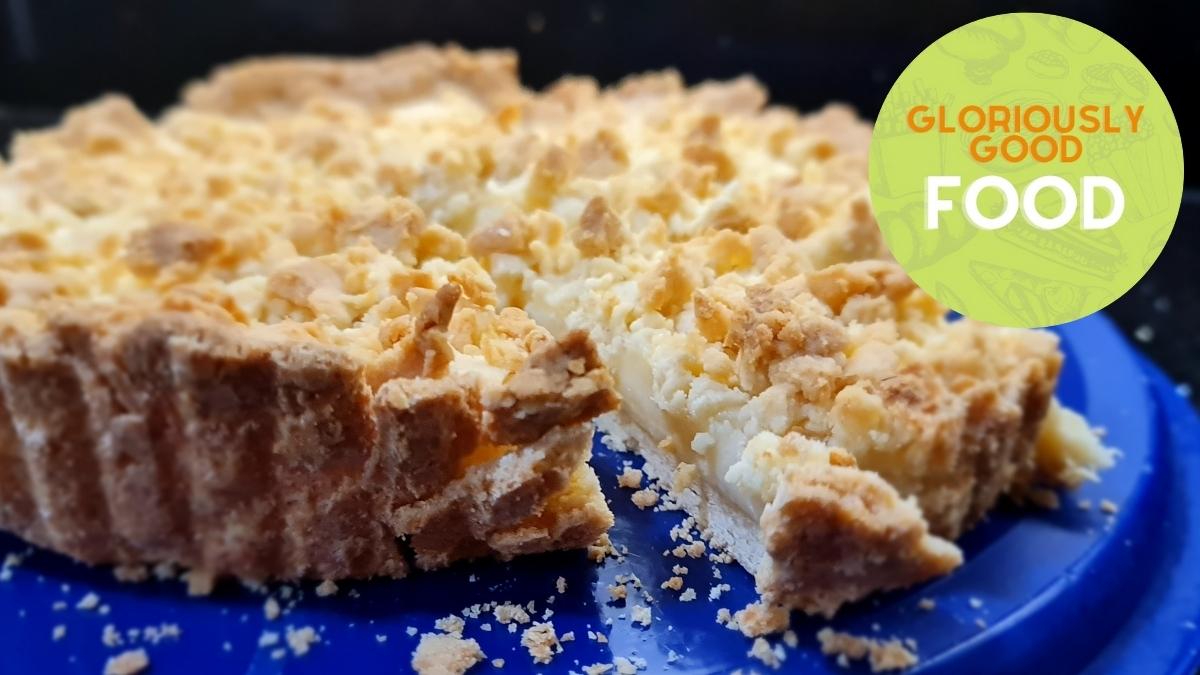
Crostata di sbriciolata alla crema pasticcera | Custard-filled crumble pie

This is an Italian recipe by Luisa Orizio (Facebook, Instagram), posted on the Giallo Zafferano Blog. I made this today as I had friends coming over and fancied something quick and easy to make for dessert that I could do with ingredients I already had in the house.

It was an absolute hit – nearly the whole lot went (and that was after we’d eaten pizza!), and I was asked to translate the recipe so they could replicate it at home!

Sbriciolata is a effectively a crumble, though the way this was done, the crumble was made with the same dough as the base, then crumbled over the top by hand, rather than an English crumble-making method. A crostata is a pie / tart. Crema pasticcera is a thick egg custard (flour is used to make it thicker than English custard) and is used as a filling in Italian pastries and cakes, and as a dessert in its own right. So, this is a pie / tart, filled with delicious thick custard and topped with a crispy crumble topping. It is simple to make and incredibly delicious! Yum 🙂

Tip: According to the original recipe post, this pie can be kept in the fridge for two days (if it lasts that long!) and can be frozen.

crostata di sbriciolata alla crema pasticcera | crumble pie with thick custard filling. Image shows the pie in its baking tin.

Ingredients (for a 22cm pie tin)

For the pastry:

  • 300g plain white flour
  • 150g butter, left to soften at room temperature (I like to use salted butter as I feel it gives the pastry more depth of flavour, but you can use unsalted, if you prefer)
  • 90g caster sugar
  • 1 yolk from a large egg
  • 1tsp baking powder

For the crema pasticcera (thick custard):

  • 500ml milk (the original recipe calls for 300ml milk and 200ml single cream, but advises you can use just milk and cook it for longer to allow it to thicken…I actually added a little bit of cornflour to the plain flour provided for in the recipe – see below)
  • 3 yolks from large eggs
  • 140g sugar
  • 40g plain white flour
  • 10g cornflour (my addition – see above)
  • 1/2tsp vanilla extract (this was my addition to the recipe; alternatively, you can infuse the milk with pieces of lemon or organge zest, to have a traditional italian crema pasticcera flavour)

Method

Start by making the pastry:

In a bowl, combine the softened butter and sugar, using a spoon. You don’t need to beat it for any length of time, just mix it well to create a sugary/buttery paste.

Add the egg yolk and mix until combined.

Add the flour and baking powder a little at a time, first mixing with a spoon, then as it gets thicker and drier, using your hands, until you have a smooth dough.

Form a dough ball, wrap it in clingfilm and rest it in the fridge while you prepare the crema pasticcera (custard).

Now prepare the custard:

Put the milk and vanilla essence in a saucepan over a low-medium heat.

While the milk is heating, beat (not whisk) together the egg yolks and sugar in a bowl, then add the flour and cornflour and mix well until you have a smooth paste, ensuring there are no lumps.

Once the milk is hot (not boiling), place the thick egg, sugar, flour and cornflour paste into the centre of the bowl containing the hot milk and leave it to cook over a low heat for 2-3 minutes without stirring, until you see some bubbles forming – a bit like little erupting volcanoes.

Tip: I must admit, this step was a bit of a leap of faith for me! I expected to find a congealed, burnt, solid lump at the bottom of the pan! Instead, I found that the milk started visibly thickening before the little volcanoes appeared, and although it took about 3-4 minutes rather than the 2 minutes in the original recipe, sure enough the little volcanoes did start appearing!

As soon as you see the little volcanic eruptions appearing, begin stirring rapidly with a hand whisk and keep stirring for a few minutes, until the custard is thick. Take the pan off the heat and let the custard cool a little while you start preparing the pie base.

Tip: I kept stirring the custard with the whisk from time to time, to help it cool faster and prevent a skin forming.

Time to assemble the pie:

Pre-heat the oven to 180°C (fan).

Place 2/3rds of the pastry between two sheets of greaseproof paper (this will prevent it from sticking to the worktop / surface, and make it easier to lift the pastry into the pie tin) and roll it out, using a rolling pin, until it is large enough to cover the base and sides of the tin.

Place the rolled out pastry into your pie tin (one with a removable bottom is preferable) and gently prick the base with a fork all over. If bits of pastry fall off, you can simply press them into the sides / base where they are needed, to plug any gaps.

Pour in the slightly cooled custard and level it with a spatula.

Roughly crumble the remaining pastry over the top of the custard.

Place in the oven and bake for approximately 30 minutes.

Let the pie completely cool (ideally to fridge temperature) before cutting it.

Serve and enjoy!

Crumble pie with thick custard filling, shown as a whole pie with one slice cut out of it and slightly pulled away from the rest of the pie.
Side view of half a sliced thick custard pie with a crumble topping.

Custard-filled crumble pie | Gloriously Simple, Gloriously Good!

Advertisement

Sweet Focaccia | Focaccia Dolce

Focaccia Dolce | Sweet Focaccia - whole with slice showing

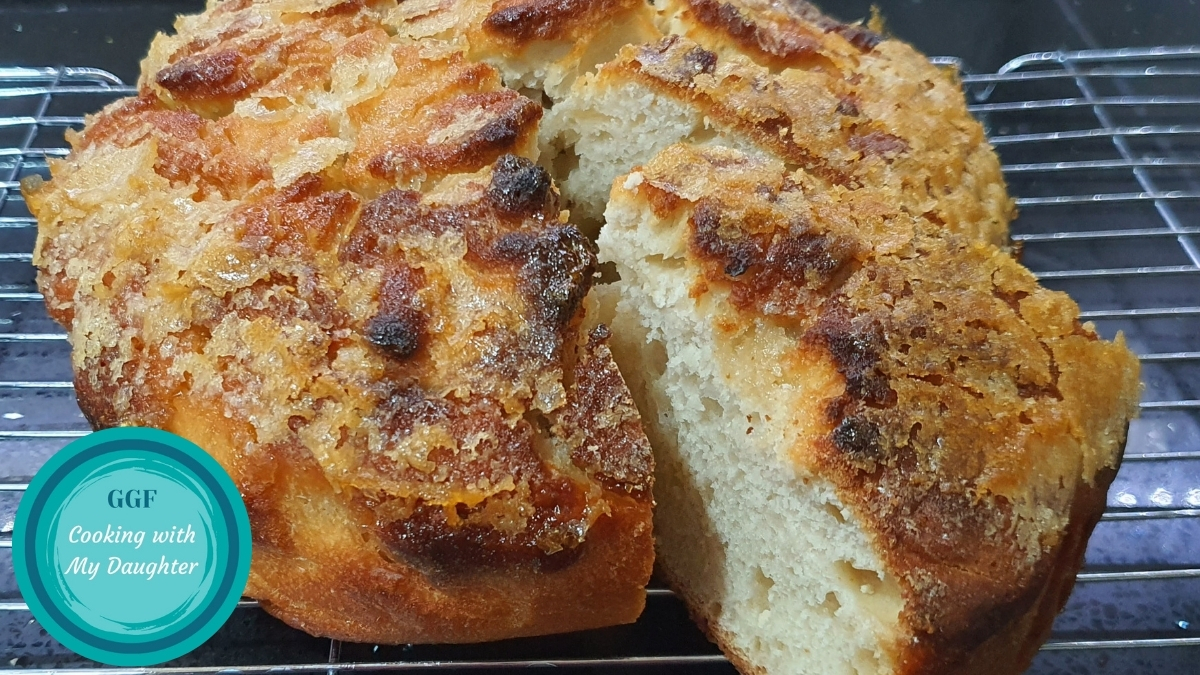
This is a delicious sweet focaccia recipe from the brilliant Italian Cucchiaio d’Argento blog. We have made this a few times and have found the recipe very easy to follow, with perfect results each time, so we wanted to share and translate it for those who can’t follow the original recipe in Italian.

This is not as sweet as a cake, but sweeter than a bread. It’s delicious as a breakfast cake/bread, on its own or spread with your favourite jam or spread (why not try it with our sweet cashew butter or our home-made nutella…coming soon!).

We have followed the recipe to the letter, aside from using plain flour to replace the 00 flour, and strong white bread flour to replace the manitoba flour, as these are more commonly available (and affordable) in the UK.

Sweet focaccia in its tin, just come out of the oven.

Ingredients – for the dough

  • 400g plain white flour
  • 100g strong white bread flour
  • 120g demerara sugar
  • 7g dried yeast
  • 200ml whole milk
  • 20ml extra virgin olive oil
  • 110-130ml water
  • 1tsp sea salt

Ingredients – for the crispy top

  • extra virgin olive oil (approximately 1tbsp plus additional for greasing)
  • approx. 1tbsp water
  • demerara sugar

Method

  1. Place the two flours, the sugar, yeast, oil and lukewarm milk into the bowl of a stand mixer.
  2. Start mixing on a low setting with a K beater, drizzling in the water in a thin stream as you do this.
  3. Once all the ingredients are mixed together, swap the K beater for a dough hook and mix it for approximately 15 minutes, adding the salt towards the end. The dough will be ready once it is smooth and elastic / bouncy.
  4. Transfer the dough into a clean bowl and cover with clingfilm.
  5. Leave it to rise until it has approximately doubled (around 2 hours). We tend to place it on a shelf in the airing cupboard, but any warm, non-draughty room will be fine.
  6. Line and grease (with extra virgin olive oil) a 24cm round cake tin (we find a springform cake tin works very well for this).
  7. Once the dough has risen, transfer it into the greased, lined tin.
  8. Pre-heat the oven to 180°C fan.
  9. Use your finger tips to create dips all over the surface and to help spread the dough evenly over the surface. We found this to be quite sticky, so you may not get perfect dips, but as long as the dough is spread reasonably evenly across the cake tin and the surface is a little rough/uneven, it will work.
  10. Whisk together 1tbsp of water and extra virgin olive oil (this will turn into a thick emulsion) and brush this over the focaccia dough surface.
  11. Sprinkle the surface with a generous amount of demerara sugar.
  12. Bake the sweet focaccia in the pre-heated oven for 30-40 minutes until the surface is looking golden and a little cracked.
  13. Leave to cool in the tin for approximately 15 minutes, then transfer to a cooling rack to cool completely, or serve warm!

This delicious sweet focaccia will keep for a few days in an airtight container, or wrapped in clingfilm and tin foil, but the crispy topping will lose its crispiness and will go more soft and sticky after the first day. It will still be delicious!

One slice of sweet focaccia

Sweet Focaccia | Focaccia Dolce | Gloriously Simple, Gloriously Good!

Food Glorious Food Recipes | Rhubarb Crumble Cheesecake | REVIEW

Recipe Review:

Food Glorious Food Rhubarb and Ginger Crumble Cheesecake

When I watched the TV series Food Glorious Food, I was struck by the uniqueness of this Rhubarb and Ginger Crumble Cheesecake, so I HAD to try it for myself!

This recipe was easy to make (though the way it was written made it not as easy to follow as I’d have liked – I kept having to read it through and go back & forth to get the steps into my head in the right order) and the result looks and tastes delicious!  Thoroughly recommend it! 🙂

Food Glorious Food Recipes | Rhubarb and Ginger Crumble Cheesecake
The cake is still a bit runny here because we couldn’t resist eating some of it, even though it was still a bit warm. You can see towards the back of the slice where it had cooled down more, how it will look when it’s set – the ricotta gives it a crumbly/grainy consistency. Delicious!!!!


Small alterations I made to the original Food Glorious Food recipe:

I didn’t use any food colouring – it might not look as pretty without the pink swirling through, but the taste is just as good!

I didn’t add the ginger to the crumble topping (because I’d forgotten to buy any!) but, to be honest, I found that the ginger biscuit base gave it plenty of ginger kick already, so I’m not sure it needs the added ginger – unless you’re a huge fan of ginger, that is.

Food Glorious Food Recipes | Rhubarb and Ginger Crumble Cheesecake